
Get started with Rowy in minutes
✨ New - Build APIs, Scheduled Jobs, Backend Workflows! Try out BuildShip ->
Building your own speech-to-text app is valuable for a variety of reasons:
This is why you'll learn how to build your own speech-to-text app with AssemblyAI and Rowy in the following article, with very little code. Our app will take a MP3 file and output a full transcript for you automatically.
First, follow the installation guide or use the Deploy shortcut to let Rowy walk you through it. It only takes 5 minutes to get started.
Then, create a new Firestore collection by adding a new table. Let's call it transcripts:

At this point you have an empty table without any data nor columns―it's perfectly fine! We are going to need:
mp3File.transcriptId. We will use a derivative column to generate it from AssemblyAI's API.transcriptStatus to know whether the transcription is complete or not.A derivative column derives its value from other columns, as its name suggests. We use this column type to add code logic used to populate some spreadsheet cells. In this example, both derivative columns will output a long text.
This is what you should obtain:

The mp3File column is where users are going to upload the file they wish to transcript.
Next, we need to write some code in the the transcriptId column, from the column config settings. transcriptId listens to the mp3File column for input, so that the code in this column automatically runs whenenver we upload an audio file.
First, we use the get-audio-duration package to determine if an audio file input is too big to transcribe.
You don’t need to install anything to use npm packages in Rowy, just import the package:
const derivative:Derivative = async ({row,ref,db,storage,auth})=>{
  const { getAudioDurationInSeconds } = require('get-audio-duration')

  // get the audio file from the mp3File column
  const audioUrl = row.mp3File[0].downloadURL

  const duration = await getAudioDurationInSeconds(audioUrl)

  if (duration > 60) {
    return "The file is longer than 1 minute, we cannot transcript that"
  }
}
Third-party services like AssemblyAI need a secret API key to use. To add a new key, click on the key icon below in the derivative script section:

Rowy Secrets abstracts Google Cloud's Secret Manager service to save and access authentication keys in a secure way. Be sure to use the same key name as below when adding the secret to your Google Cloud account:
const assemblyKey = await rowy.secrets.get("assemblyai")
This is useful because we don’t need to reveal our API key. Rowy takes care of injecting the secret at runtime.
The Fetch Web API is already available in Rowy, so you can use it as you would in any frontend app:
const res = await fetch("https://api.assemblyai.com/v2/transcript", {
  method: "POST",
  headers: {
      "Content-Type": "application/json",
      "Authorization": assemblyKey
  },
  body: JSON.stringify({
      "audio_url": audioUrl,
      "webhook_url": <YOUR WEBHOOK URL> // see part 3 of the article
  })
}).then(res => res.json())
The final code of the transcriptId column will look like this:
const derivative:Derivative = async ({row,ref,db,storage,auth})=>{
  const { getAudioDurationInSeconds } = require('get-audio-duration')

  // get the audio file from the mp3File column
  const audioUrl = row.mp3File[0].downloadURL

  const duration = await getAudioDurationInSeconds(audioUrl)

  if (duration > 60) {
    return "The file is longer than 1 minute, we cannot transcript that"
  }

  const res = await fetch("https://api.assemblyai.com/v2/transcript", {
    method: "POST",
    headers: {
        "Content-Type": "application/json",
        "Authorization": assemblyKey
    },
    body: JSON.stringify({
        "audio_url": audioUrl,
        "webhook_url": <YOUR WEBHOOK URL> // see part 3 of the article
    })
  }).then(res => res.json())

  return res.id
}
When we upload a file for transcription, the AssemblyAI API doesn’t respond directly with the transcript. Instead, we get a transcription id we can then use to monitor the transcription's status and the destination file.
Since we don't want to query the API manually, we use a webhook. The webhook URL created with Rowy will receive a HTTP request when a transcription is ready for us to use. You need to specify this URL in your first API call to AssemblyAI, using the webhook_url property:
body: JSON.stringify({
    "audio_url": audioUrl,
    "webhook_url": <YOUR WEBHOOK URL>
})
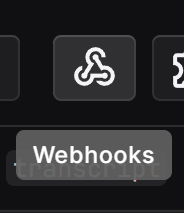
Then, click on the webhooks button in the top right corner of your table dashboard:
Next, create a new basic webhook. In this tutorial, we won't cover webhook authentication but you'll need it if you run your app in a production environment.
The webhook parser code will automatically update the row related to the incoming request with the completed status:
const basicParser: Parser = async ({ req, db, ref }) => {
  const { body } = req
  const { status, transcript_id } = body

  const docQuery = await ref.where("transcriptId", "==", transcript_id).get()

  await docQuery.docs[0].ref.update({ transcriptStatus: status })
}
We use Firebase's default functions to interact with the database.
The transcript column will wait for the transcriptStatus column to display completed, then fetch the transcription from the AssemblyAI API.
We are sure the transcript has already been processed thanks to the use of a webhook.
This column should have transcript status as it’s listener fields and the output is long text.
The code for this column will look like this:
const derivative:Derivative = async ({row,ref,db,storage,auth})=>{
  if(row.transcriptStatus != "completed") {
    return ""
  }

  const assemblyKey = await rowy.secrets.get("assemblyai")

  const res = await fetch(`https://api.assemblyai.com/v2/transcript/${row.transcriptId}`, {
    method: "GET",
    headers: {
      "Content-Type": "application/json",
      "Authorization": assemblyKey
    },
  }).then(res => res.json())

  return res.text
}
And that's it! Your speech-to-text app is now ready to use. All you need is a MP3 file. If you need to handle longer audio, you can split them into 1-minute chunks and have Rowy take care of the processing.


